
Let's get started on your website at Z.com! ③-1 Settings for adding a new Cloud server
Tuesday January 5th, 2016 BlogHi! This is Z.com editorial team.
Following the previous article, we're going to highlight the details of the settings for adding a new server in three articles.
This time, we will focus on "Cloud".
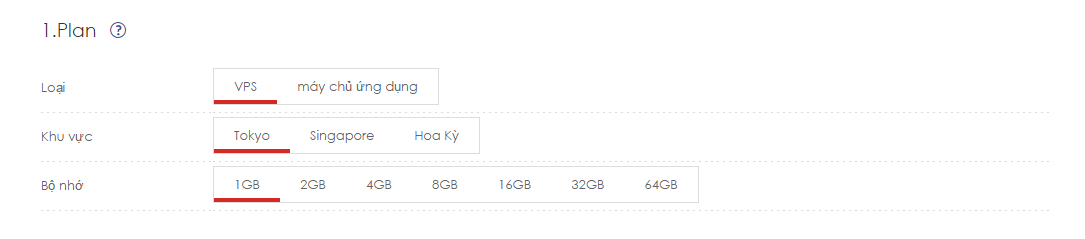
●1 Plan
1-1.Type:
Choose a server type from "VPS" or "Application Server." Choose a "VPS" for this time.
1-2.Region:
Choose your preferred region for the datacenter from Tokyo, Singapore, or U.S.
If you are publishing your contents mainly for Southeastern-Asia, choose "Singapore" for more speedy connection.
1-3.Memory:
Choose a volume of memory. If you don't need much memory, select 1GB or 2GB. In the case you need a high volume, select a plan over 16GB.
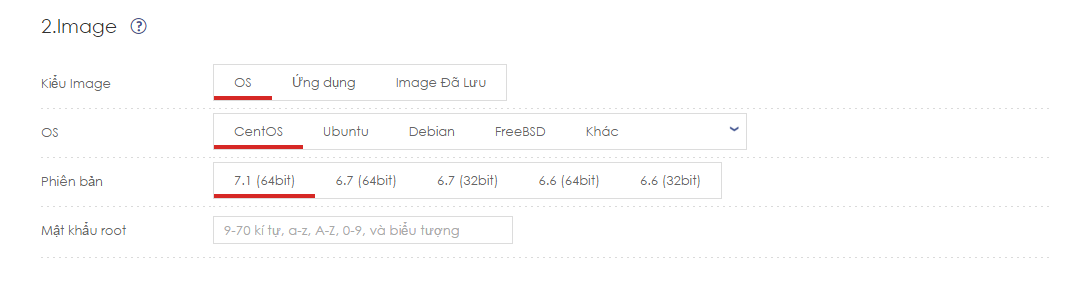
●2 Image
2-1.Image Type:
Select an image type you'd like to use for a new server. You can choose from either an image which OS or application is pre-installed, or a saved image you've created by yourself.
<When selecting "OS">
OS:
Choose a OS you'd like to use. Selected OS wil be installed and set up automatically when deploying a new server so that you don't have to install them at the console screen by yourself. CetOs, Ubuntu, and Debian are the most popular OS types.
Version:
Select a version of OS. In general, the latest version have the strongest security and the richest feature.
<When selecting "Application">
Application:
Choose an application you'd like to use. Selected application wil be installed and set up automatically when deploying a new server so that you don't have to install them at the console screen by yourself. We offer more than 20 kinds of applications including "LAMP(PHP)", "WordPress(KUSANAGI)", "Ruby on Rails."
Version:
Select a version of application.
<When selecting "Saved Image">
Choose a saved image you'd like to use.
2-2.root Password:Registering a root Password is required whichever the image type you chose.
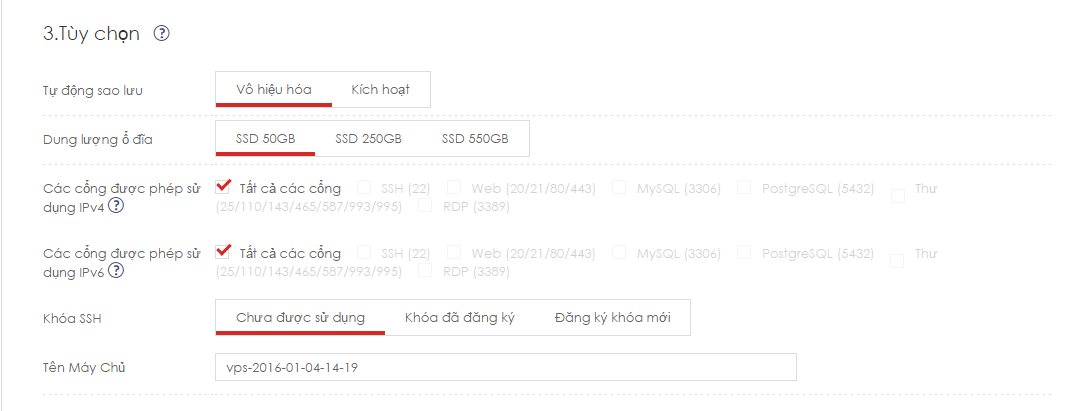
●3 Option
Auto-Backup:
You can enable an Auto-Backup function from here. It automatically takes a backup on a daily basis. it is highly recommended especially for the beginners.
Disk Capacity:
Select a volume of a disk capacity you'd like to start with. You can add more capacity later as well.
Port Permission(IPv4、 IPv6):
You can set a port to be open with one click, so you don't have to enter any command at the console screen by yourself. It saves a lot of time.
SSH Key:
You can increase security by setting a SSH Key.
Name Tag:
The default name is the date and time of the setting. It can be changed as you like.
Have you succeeded adding a new Cloud server?
Next time, we are going to highlight the details of the settings for adding a new WordPress server.
---------------------------------------------------------------------------------------------------------------------------------------
Thank you so much for reading this article.
We'd like to send you relevant and insightful information about Domain, Shared Hosting, WordPress Hosting, Cloud Hosting and SSL.
If you have any comments or request, please feel free to contact us.
Have a great day!